How to Evaluate Finish Quality on Custom Wooden Boxes
For importers, distributors and private label brands, finish quality on custom wooden boxes is not just a cosmetic issue. It directly affects claim rates, customer feedback, brand perception and repeat-order stability. When you assess a new supplier or develop a new OEM/ODM project, you need a structured way to evaluate finish quality beyond looking at a few nice samples.
As a factory-oriented partner, Chic Homeware focuses daily on wood selection, moisture control, surface finishing, logo processes, structure optimization and export packaging. This article summarizes practical checkpoints you can use when evaluating the finish quality of custom wooden boxes from any supplier, whether you are sourcing acacia gift boxes, pine storage boxes, bamboo tea boxes or MDF veneer presentation sets.

Why Finish Quality Matters in B2B Wooden Box Projects
In B2B projects, finish quality directly ties to commercial metrics, not just aesthetics. A box that looks good in a catalog but arrives with scratches, uneven color or swelling panels will quickly turn into returns, poor reviews and margin loss.
- Damage claims and returns: Poorly cured coatings or weak edges and corners lead to chipping and visible damage after transport or minimal handling.
- Brand perception: Uneven stain, rough surfaces or inconsistent logo application can make a premium brand look low-end, especially in gift packaging and e-commerce presentation.
- Listing stability for online sellers: For Amazon sellers and online brands, finish issues show up in reviews and can impact listing ranking and ad performance.
- Repeat-order consistency: Inconsistent finish from batch to batch causes headaches when replenishing SKUs or expanding to new channels with the same product.
The solution is to build finish-quality checks into sampling, PO confirmation and pre-shipment inspection. The sections below outline where to look and what questions to ask.
Understand the Base Material: Wood Species and Substrates
Finish quality always starts with the base material. Different wood species and substrates behave differently under stain, paint and clear coats. When you evaluate custom wooden boxes, clarify exactly which material your supplier is using and how it will affect the final surface.
Acacia, Pine, Paulownia and Bamboo
- Acacia: Dense and durable with rich grain and color variation. Acacia takes oil and clear coats very well, showing a premium, warm tone. However, color variation between boards requires careful selection and consistent finishing to avoid a patchy appearance.
- Pine: Softer and lighter-colored, cost-effective and common for storage boxes and value-range gift boxes. Pine can show dents more easily and requires careful sanding to avoid raised grain after coating.
- Paulownia: Very light and soft, ideal for lightweight gift packaging and larger-size boxes where weight matters. Because it is soft and porous, it needs controlled sanding and sealing to prevent fuzzy surfaces and uneven stain absorption.
- Bamboo: Technically a grass, often laminated into boards or panels. Bamboo has a modern look and is stable, but end grain and edges must be properly sanded and sealed, or they can feel sharp or absorb moisture.
Walnut, MDF Veneer and Plywood Veneer
- Walnut: Darker, high-end hardwood. Typically used when premium appearance is crucial. Walnut finishes should highlight natural grain; too-heavy stain can make it look flat.
- MDF veneer: A veneer layer bonded to an MDF core. This offers a smooth, uniform surface ideal for painted finishes or clean modern stains. Edges and corners must be treated properly so the MDF core is not exposed.
- Plywood veneer: Veneer over plywood core. More dimensionally stable for larger boxes, but the finishing process must handle edge banding and exposed plies to avoid visible layers at the edges.
When you discuss a project, ask for clear material descriptions and, ideally, cross-section photos or material samples. A factory like Chic Homeware manages multiple material routes and can recommend whether solid acacia, pine, bamboo or a veneer-based structure is more suitable for your finish, price and weight targets.

Moisture Control: The Foundation of a Stable Finish
Moisture content is one of the most common hidden reasons behind finish problems. If the wood is not properly dried and balanced before finishing, you can see warping, cracking, joint movement, paint peeling or cloudiness in clear coats after arrival in your market.
Key Moisture-Related Checkpoints
- Moisture target: Ask which moisture range the factory uses for your destination market. For export to Europe and North America, this is often around 8–12% depending on product and structure.
- Moisture testing: Confirm whether the factory uses moisture meters during incoming wood inspection and at pre-production stages.
- Balancing time: Check if the wood is given time to stabilize after kiln drying and before machining and finishing.
- Sampling consistency: Ensure pilot samples are produced under the same moisture conditions as mass production, not only from a specially prepared batch.
When evaluating a supplier, do not just inspect the surface visually. Ask them to explain their moisture control workflow. A detailed explanation indicates real process control rather than one-time, sample-level quality.
Sanding Quality: The First Thing You Feel
Most buyers look first at color and gloss, but end users will notice sanding quality the moment they touch the box. Roughness, sharp edges and inconsistent sanding are frequent reasons for dissatisfaction in both retail and online feedback.
How to Evaluate Sanding Consistency
- Run fingers along all edges: Edges and corners should feel smooth but not overly rounded (which can make the box look cheap or visually inconsistent with technical drawings).
- Check inside surfaces and compartments: Many factories focus on exterior surfaces and neglect interiors, inserts and compartment dividers. Make sure these are also smooth, especially for jewelry, cosmetic or gift boxes.
- Look against light: Hold the box at an angle to a light source. Inconsistent sanding often shows as dull patches or swirl marks under semi-gloss or high-gloss finishes.
- Check cross-grain scratches: On visible surfaces, sanding should follow the grain direction. Random cross-grain scratches will become more obvious after staining.
- Touch test after coating: Run your fingers on coated surfaces to feel for raised grain, dust particles or small bumps trapped in the finish.
Stain and Paint Finish: Color, Evenness and Protection
Stain or paint is what your customers see first in listings and on shelves. A good finishing process combines color accuracy, evenness and adequate protection for the intended use (display, storage, frequent handling, kitchen environment, etc.).
Color Matching and Batch Consistency
- Confirm a master color standard: Use a physical master sample or a clearly defined color code (and gloss level) as the reference for all future orders.
- Check color in different lights: Evaluate samples in natural daylight and under indoor lighting, especially for mid-tone stains where subtle shifts are obvious.
- Compare multiple pieces: Ask the factory to send several units from the same sample batch, not only one perfect sample, to check internal consistency.
- Note natural variation: With acacia and walnut, some variation is expected. The question is whether the factory can manage selection and stain application so that the overall look meets your brand positioning.
Evenness and Coverage
- Check edges, corners and interior corners: These are common areas where stain or paint is thinner or missed.
- Look for runs and drips: On vertical surfaces, poor spray control can leave drip marks, especially on darker paints.
- Assess open grain filling: On open-grain woods, decide whether you want the grain filled and smooth or visible. Make sure the finishing spec matches your brand’s visual expectation.
- Inspect transition areas: For mixed-material designs (e.g., bamboo body with MDF veneer lid), check transitions for clean masking and no overspray.
Coating System and Protection Level
Different markets and applications require different coating systems: clear lacquer, water-based paint, oil finishing, or UV coatings. When you evaluate samples:
- Ask which coating system is used: Water-based, PU, UV, oil, or a combination. This impacts smell, touch, durability and compliance discussions.
- Conduct a light scratch test: Gently use a fingernail on a hidden area or on the bottom. The coating should not scratch easily under normal pressure.
- Test for household resistance: Wipe with a damp cloth on a corner to see if color transfers. For kitchen-related boxes or trays, a simple test with mild detergent on a cloth can show basic resistance.
- Check curing: If the coating feels slightly soft, tacky or has a strong solvent smell after days out of the box, curing may be insufficient.

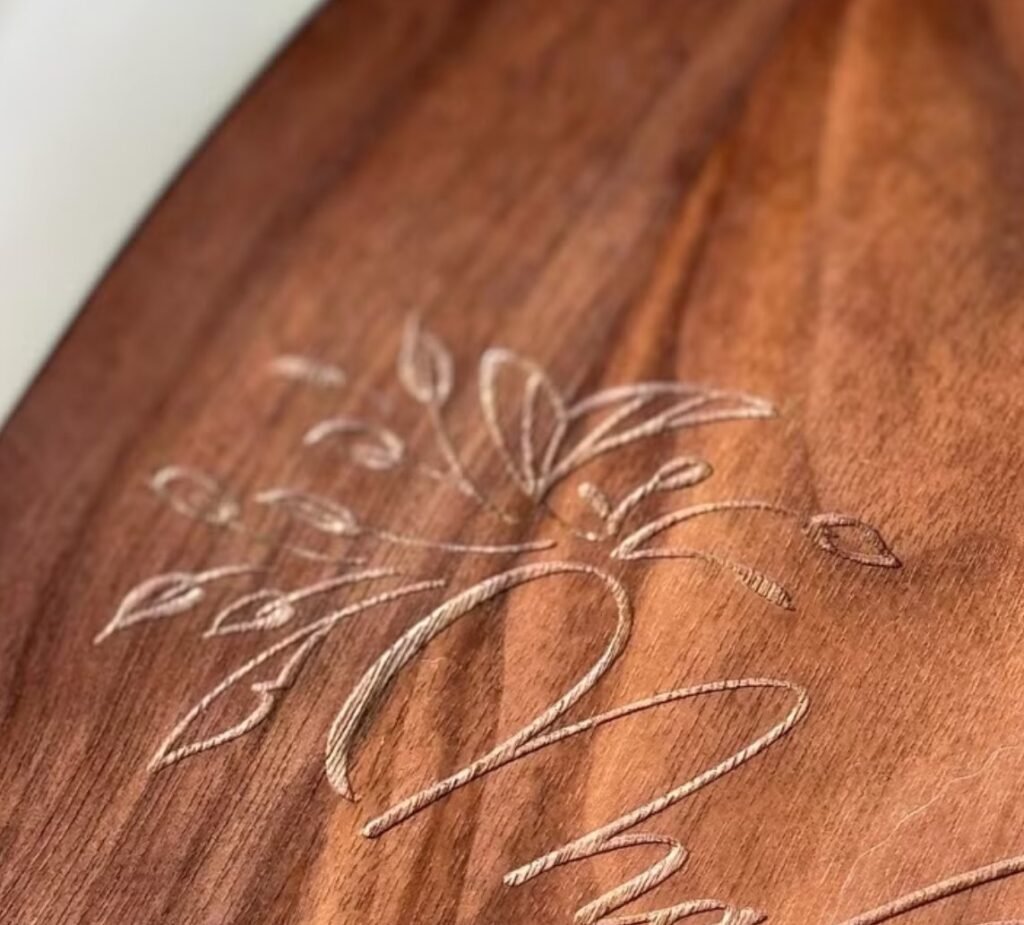
Logo Application and Branding Finish
In many OEM/ODM wooden box projects, the logo area is what appears in photos, unboxing videos, and social media posts. A technically good box with a poor logo application will still be perceived as low quality.
Common Logo Processes on Wooden Boxes
- Laser engraving: Clean, precise and widely used. Works well on acacia, pine, bamboo and most veneers. Confirm depth and color contrast are sufficient for your branding.
- Silk-screen or pad printing: Good for colored logos or fine lines. Ask for a test on the actual coating system to ensure adhesion and color stability.
- Heat stamping or foil stamping: Often used for metallic effects on darker finishes. Surface smoothness and even pressure are critical to avoid broken impressions.
- Inlays or metal plates: Used for higher-end projects. Finishing quality must include clean routing, secure adhesion and consistent positioning.
What to Check in Logo Samples
- Alignment: Compare logo position against technical drawings or mockups. Small shifts become very visible on symmetrical box designs.
- Sharpness: Edges of letters and small details should be crisp; blurred or fuzzy edges indicate poor plate or setup.
- Color density: For printed logos, ensure that color blocks are solid without pinholes or fading.
- Consistency across pieces: Request several units with logos during sampling to check whether placement, depth and color vary.
Hardware Fitting and Structural Finish
The interaction between surface finish and hardware directly affects user experience. Hinges, clasps, magnets and screws must be integrated without damaging the coating or compromising structure.
Hinges, Clasps and Screws
- Screw seating: Screws should sit flush, without cracking the surrounding coating or wood. Over-tightening can cause micro-cracks that expand during shipment.
- Hinge alignment: Lids should open and close smoothly without rubbing. Misalignment often leads to scratches in the finish along the hinge or edge.
- Repetitive-opening test: Open and close the lid multiple times to check if the finish around the hinge area starts to show wear or friction marks.
Magnets and Invisible Fittings
- Magnet countersinking: Magnets should be fully embedded; visible gaps or filler around magnets suggest weak process control.
- Magnetic strength vs. finish: Magnets that are too strong can cause impact marks where the lid meets the body. Check for any finish damage in the contact area.
Inserts, Compartments and Lining
- Compartments and dividers: Should be cleanly cut and well finished on all accessible surfaces. No rough splinters or unfinished edges.
- Fabric or EVA inserts: If the project uses fabric, foam or EVA inserts, check the interface between insert and wood. Glue residue or misaligned inserts will downgrade the perceived finish quality.
Export Packaging and Finish Protection in Transit
Even a well-finished custom wooden box can arrive damaged if export packaging is not aligned with the product’s surface sensitivity. As a Wooden Products Factory in China, Chic Homeware treats packaging as part of finish protection, not a separate afterthought.
Individual Packaging Options
- Polybag or tissue wrap: Basic protection against dust and minor scratches.
- Bubble bag or foam sleeve: Suitable where surface finish is delicate or gloss is high, especially for darker stains and paints that show scratches more easily.
- Color box: For retail-ready items, the inner carton also needs attention to fit, inserts and internal protection.
Outer Carton and Drop-Test Thinking
- Carton structure: Check if cartons are single or double wall, and how many sets per carton. Heavy wooden boxes require stronger cartons and optimized stacking patterns.
- Internal partitioning: Use honeycomb or card partitions, corner protection or foam blocks to prevent edge and corner damage.
- Drop-test mindset: Even if formal testing is not done for every SKU, your supplier should design packaging as if a typical drop test may happen in the logistics chain.
During sampling, ask for dressed-up packaging samples: 1–2 pieces packed exactly as for mass production, including inner, outer cartons and carton marks. Then you can judge whether the finish is adequately protected for your channel (FBA, wholesale pallets, or direct-to-store delivery).
How to Evaluate Finish Quality During Sampling and Pre-Shipment
To maintain control over finish quality on custom wooden boxes, you need a simple but structured process for sampling, approval and inspection.
Sampling Phase
- Request production-feasible samples: Avoid over-polished samples that do not reflect real mass production conditions. Ask the factory to confirm that sample finishing follows the same process planned for bulk orders.
- Specify measurable items: Where possible, define gloss level, color targets, edge radius and logo size in drawings or spec sheets.
- Check multiple units: Approve not just one sample but evaluate several units to understand internal variability.
- Document observations: Take photos and annotate any areas of attention (e.g., inside corners, hinge area, magnet contact points) so the factory can adjust.
Golden Sample and Confirmation
- Sign off a golden sample: Keep one sample at your side and one at the factory. Reference this for all future POs.
- Include finish notes in the PI: Summarize key finish requirements—color, coating system, logo position, surface smoothness—directly in the purchase invoice or technical contract.
Pre-Shipment Inspection Focus
- Sampling method: Use a random sampling method (AQL or similar) and make finish quality part of the inspection checklist, not only size and quantity.
- Checklist items: Sanding feel, color consistency, coating evenness, logo accuracy, hardware alignment and basic scratch resistance should all be checked.
- Packaging verification: Confirm that inner wrapping, partitions and outer cartons match the agreed specification.
Balancing Finish Quality with MOQ and Price Structure
For many buyers, the key challenge is balancing finish quality with MOQ and target price. Higher finishing standards require more process time, material and QC. The objective is not always to maximize perfection, but to find the right level for your channel and price point.
Typical Trade-Offs
- Material vs. finish complexity: A premium wood like walnut or acacia can support a simpler, clear finish while still looking high-end. More economical woods may require more careful finishing and stain to achieve a similar perceived value.
- Number of coats vs. unit price: Reducing coating layers will reduce cost but also scratch resistance and depth of color. Discuss where you can accept small compromises.
- Logo process vs. quantity: Laser engraving may be efficient at lower MOQs, while multi-color printing or foil stamping might require higher MOQs to keep unit costs under control.
A factory with OEM/ODM experience, like a Custom Wooden Products Manufacturer, can help you adjust specifications—material choice, finish system, logo method and packaging—to hit your target price while keeping finish quality within your acceptable range.
Applications: Different Finish Priorities by Use Case
Not every custom wooden box requires the same finish level. Your priorities will differ depending on whether you are producing gift packaging, storage boxes, kitchen-related products or decorative sets.
Gift and Presentation Boxes
- Priority: Visual impact and flawless logo presentation.
- Key checks: Color depth, evenness, dust-free surfaces, crisp logo, internal lining or inserts, and clean edges.
Storage and Organizer Boxes
- Priority: Durability and functional protection.
- Key checks: Scratch resistance, edge strength, hardware strength, and interior finish smoothness.
Kitchen and Pantry Boxes or Trays
- Priority: Cleanability and resistance to moisture and stains.
- Key checks: Coating resistance to wiping, minimal smell, smoothness without cracks and suitable packaging to avoid damage during transport.
E-commerce and FBA-Focused Boxes
- Priority: Consistency across orders and robust packaging.
- Key checks: Batch-to-batch color consistency, logo consistency, and packaging that can handle typical parcel delivery and warehouse handling.
Working with Chic Homeware on Finish-Driven Projects
Chic Homeware focuses on OEM/ODM projects for custom wooden boxes, organizers, trays and gift packaging with a factory-oriented workflow. When you develop a project with us, finish quality is built into each step:
- Material selection: Acacia, pine, paulownia, bamboo, walnut, MDF veneer and plywood veneer options chosen to support your price and finish expectations.
- Moisture and structure planning: Wood treatment, panel design and joinery choices aligned with your export market and usage scenario.
- Surface finishing development: Sample-based development of stain or paint, coating system and gloss level, with clear documentation.
- Logo and branding setup: Laser, printing, stamping or mixed-material branding tested on actual finish systems before mass production.
- Packaging planning: Inner packaging, color box and carton design that protects the finish and aligns with your channel requirements.
If your project is heavily focused on presentation and surface appearance, our Custom Wooden Boxes development support can help you define practical finish specifications so that they are repeatable and scalable, not just “sample-level quality.”
Conclusion: Make Finish Quality a Structured Part of Your Sourcing
Evaluating finish quality on custom wooden boxes requires more than a quick visual check. When you consider material selection, moisture control, sanding consistency, stain or paint systems, logo application, hardware integration and export packaging, you gain a realistic picture of what mass production will look like.
By building these checkpoints into sampling, PO confirmation and pre-shipment inspection, you can reduce finish-related complaints, stabilize your listings and strengthen your brand’s visual identity across markets. If you are planning a new wooden box, organizer or gift packaging project and want finish quality to be both attractive and repeatable, you can discuss your requirements, materials and channel with the Chic Homeware team.
To explore finish options, MOQ possibilities and packaging solutions for your next project, you can Contact Chic Homeware and share your drawings, reference photos or target samples. We will help you translate them into a feasible, finish-focused production plan.